Pick-Drop Food Delivery
Business Scenario
In Singapore, kStore offers online food delivery service. Each delivery order consists of one pick-up job from a restaurant and one drop-off job to the client address. The orders are sent to Kandbox Dispatch platform via APIs and dispatched to workers immediately.
The main difference between this guide and others is that we are using an order concept to include two jobs. The two jobs (Pick & Drop) in the same order must be assigned to one worker and pick must happen before the pick job in the same order.
All codes in this example can be found in repository: KDClient . The main programs/scripts for this example are:
- python demo
- HTTP scripts
Prerequisite
- You should already have a Kandbox Dispatch Account. If not, please go to kandbox dispatch to register one account.
- To run the sample python program, you should have python installed in your environment. We are building the client example by Python and Restful APIs. VSCode is our preferred IDE. The HTTP scripts are coded in rest-client format.
Execute the Example Python Program in one go
The first step is to clone the repository to your local computer:
git clone https://github.com/kandboxAI/dispatch_clientThen install the required packages to your python environment:
cd kdclient
pip install -r requirements.txt
Configure the required environment variables with the information you have registered to Kandbox Dispatch:
# export server_url=http://_server_url_/kd/api/v1
# export email=_email_@email.com
# export password=_pass_
# export team_code=_team_
Then you can run the sg_pickdrop demo program by:
python ./src/sg_pickdrop.pyAfter the program finish, you should be able to view the planned route in the Web UI.
Run APIs Step by Step
The previous Python program executes several steps in one go. To learn and test the APIs one by one, you can follow steps in this section. This sequence is also the sequence of API being used in the python program.
Create a team
To use the restful APIs, you should first use the Login API to get a token for each sub-sequent API calls.
POST {{hostUrl}}/auth/login
Content-Type: application/json

{"email": "{{user}}", "password": "{{pass}}"} url = f"{self.service_url}/auth/login"
login_info = {"email": username, "password": password}
response = self.requests.post(
url, json=login_info, headers={"Content-Type": "application/json"},
)With the token, we will create our team at Singapore with this API call:
POST {{server_url}}/teams/
Authorization: Bearer {{jwtoken}}
Content-Type: application/json

{
    "code": "sg1", "name": "sg1",
    "geo_longitude": 103.835,
    "geo_latitude": 1.303,
    "planner_service": {"code": "pickdrop"},
    "flex_form_data": {
        "fixed_horizon_flag": "1",
        "env_start_datetime": "2024-02-14T00:00:00",
        "horizon_start_datetime": "2024-02-14T08:01:01",
        "nbr_minutes_planning_windows_duration": 2880
    }
}
To deal with pick & drop jobs in one order, we are using a different planner code "pickdrop". We are still fixing the planning window for testing purpose by setting the parameter "fixed_horizon_flag" = 1.
Create Workers
We can now create the workers one by one with this API call:
POST {{server_url}}/workers/   HTTP/1.1
Content-Type: application/json
Authorization: Bearer {{jwtoken}}

{
    "code": "w1",
    "name": "w0",
    "team": {"code": "{{team_code}}"},
    "geo_longitude": 103.835,
    "geo_latitude": 1.303,
    "flex_form_data": {"area_code": "A", "capacity_volume": 0, "max_nbr_order": 0},
    "business_hour": {
        "monday": [{"open": "0005", "close": "2330", "id": "a0", "isOpen": true}],
        "tuesday": [{"open": "0005", "close": "2330", "id": "a1", "isOpen": true}],
        "wednesday": [{"open": "0005", "close": "2330", "id": "a2", "isOpen": true}],
        "thursday": [{"open": "0005", "close": "2330", "id": "a3", "isOpen": true}],
        "friday": [{"open": "0005", "close": "2330", "id": "a4", "isOpen": true}],
        "saturday": [{"open": "0005", "close": "2330", "id": "a5", "isOpen": true}],
        "sunday": [{"open": "0005", "close": "2330", "id": "a6", "isOpen": true}]
        },
    "auto_planning": true,
    "is_active": true
}
Reset Planning Window
After we have created the workers, we should reset the planning window to initialize the planning engine.
POST {{server_url}}/planner_service/reset_planning_window/   HTTP/1.1
Content-Type: application/json
Authorization: Bearer {{jwtoken}}

{"team_code":  "{{team_code}}"}
If resetting is successful, you should be able to view gantt chart with worker's empty working slot.
Create Orders
Now we can add orders to this team. Each order has two jobs. In this guide, we should dispatch the orders immediately, which means to set auto_planning=true.
We can create the orders one by one with this API call:
@order_code2=ord2

###
# @name create_order_2

POST {{server_url}}/orders/  HTTP/1.1
Content-Type: application/json
Authorization: Bearer {{jwtoken}}

{
    "code": "{{order_code2}}",
    "flex_form_data": {"area_code": "A"},
    "order_type": "pickdrop",
    "auto_planning": true,
    "auto_commit": true,
    "team": {"code": "{{team_code}}"} ,
    "job_list": [
        {
            "code": "{{order_code2}}-p",
            "geo_longitude":103.8601, "geo_latitude": 1.30598,
            "job_type": "visit",
            "planning_status": "U",
            "auto_planning": true,
            "flex_form_data": {"area_code": "A"},
            "requested_start_datetime": "2024-02-14T02:03:00",
            "requested_duration_minutes": 0.5,
            "order_code": "{{order_code2}}",
            "team": {"code": "{{team_code}}"}
        },
        {
            "code": "{{order_code2}}-d",
            "geo_longitude": 103.88465, "geo_latitude": 1.313883,
            "job_type": "visit",
            "planning_status": "U",
            "auto_planning": true,
            "flex_form_data": {"area_code": "A"},
            "requested_start_datetime": "2024-02-14T03:03:00",
            "requested_duration_minutes": 0.5,
            "order_code": "{{order_code2}}",
            "team": {"code": "{{team_code}}"}
        }
    ]
}
Since we are using "auto_planning"=true, the order should be planned immediately. If successfuly, you should see result with Status="COMMITTED".
Read the planning result
You can use this api to get the planned jobs for any worker.
POST {{server_url}}/planner_service/get_env_jobs/ HTTP/1.1
Content-Type: application/json
Authorization: Bearer {{jwtoken}}
{
"team_code": "{{team_code}}",
"worker_codes": "w0",
"reset_start_datetime": false,
"active_only":false
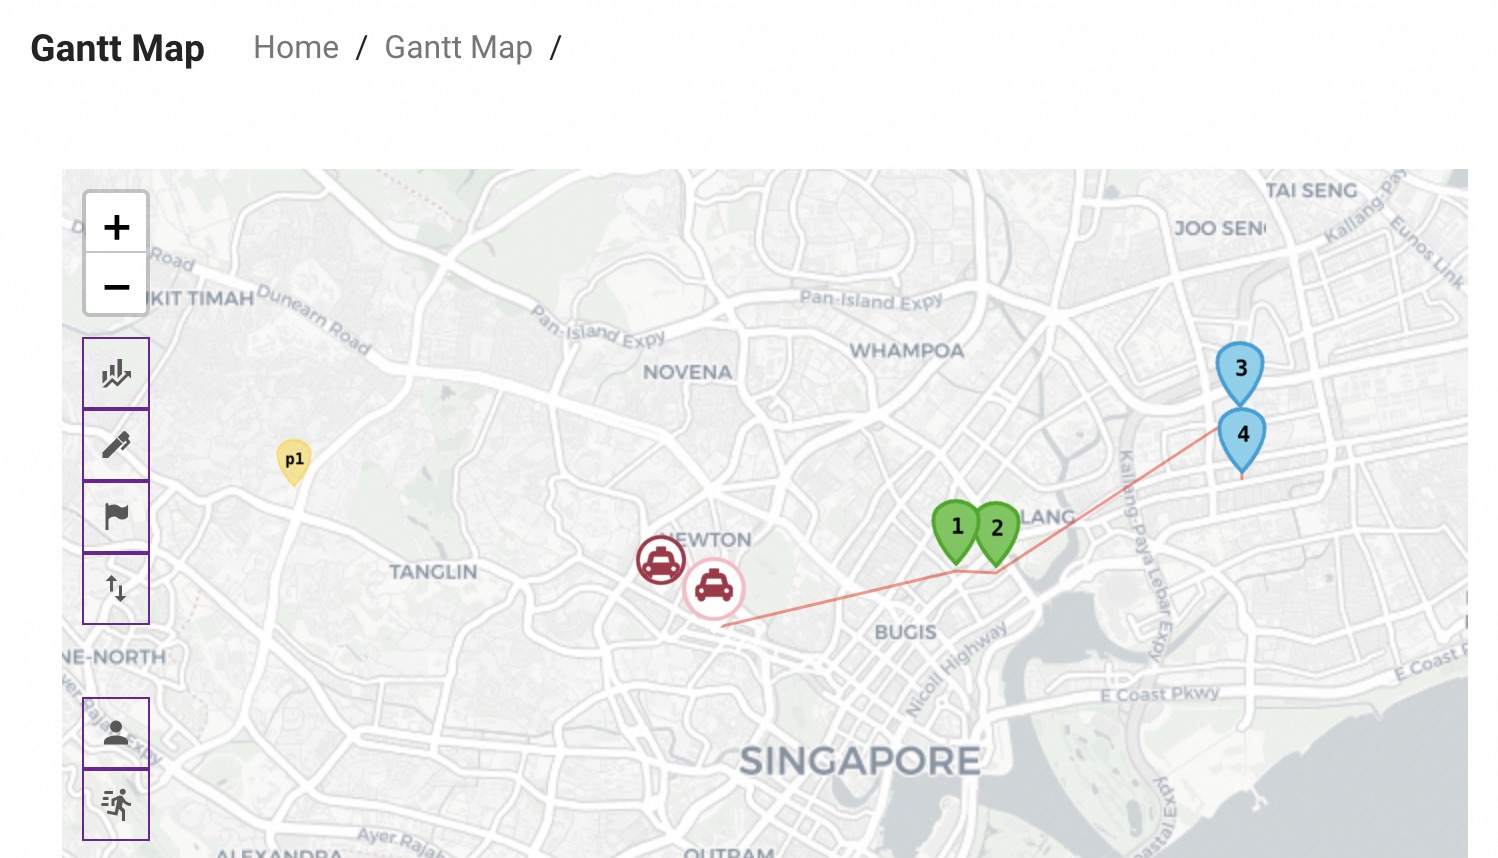
}Review the planned result in the Web UI
After the planning is done, you can login to the Kandbox Dispatch platform. You should be able to see a map of Singapore with planned workers and jobs on the map.
More Advanced Configurations
After completing this basic configuration, you can perform simple automatic order dispatching. For more detailed information on the capability to configure rules, please visit Delivery Business Configuration Parameters.